Starting A Blog For Stay At Home Moms

This post may contain affiliate links. As an Amazon Associate, I earn from qualifying purchases.
If you’re a stay at home mom who’s been thinking about starting a blog, this is your no fluff guide to getting your mom blog set up.
If you’ve done any research into blogging, then I’m sure you’ve noticed there are A LOT of opinions about how to set up and build your blog.
Don’t worry – I’m not going to waste your time because, to be honest, time is the most valuable resource these days so I like to get to the point.
My goal is to clearly define how to start a blog for stay at home moms.
The key to starting and building a successful blog is laying your foundation properly.
And, that’s what this post covers, so let’s get started!
How to Start A Blog For Stay At Home Moms
From the day you start a blog, you need to think about it as a business.
You’re a stay at home mom who is looking to be creative while also adding income to the family budget, am I right?
I see a lot of blogging resources leave out the fact that blogging is a business (unless you want to do it for pleasure only) and it’s not a fair way to start!
Step 1 – What do You Want to Blog About?
While I completely agree you’ll have an easier time building a successful blog around something you enjoy, deciding on the topic of your blog doesn’t have to mean you’ve chosen your ultimate passion project.
If you’re anything like me, you have LOTS of things you’re passionate about.
And, those things are constantly changing, am I right?
So, the first step to starting a blog is to write down all of the topics you like.
Some you may be more passionate about than others.
The next step is to take a hard look at those topics and research how they can be monetized.
Could you create an ebook?
Could you sell printables?
Perhaps you know you could create a course that’s missing in the niche you’re eyeing.
There are many different ways to monetize a blog so don’t worry.
The idea here is to find something you wouldn’t mind blogging about that has the potential to make money in the first place.
In my own blogging business, I’m passionate about the following things:
✔Helping new moms navigate the overwhelming journey of being pregnant and becoming a mom.
✔Helping moms heal from postpartum properly.
✔Sharing side hustle ideas for moms who want to work at home.
And, the list is endless…
Need help finding a blog niche? Download 50 Blog Niche Ideas for Stay at Home Moms – it’s FREE!
Step 2 – Choose a Domain Name
Choosing a blog name is SO much fun!
No, seriously it is.
I know new bloggers think they have to come up with THE ultimate name but that really isn’t the case.
It’s a good idea to take your time brainstorming a blog name but don’t let this be the step that stops you from moving forward, okay?
Keep these tips in mind when choosing a name:
✔ Lets your readers know what your blog is about.
✔ Short and to the point.
✔ Easy to remember.
✔ A name you can brand as you grow.
Sit down with a piece of paper and jot down whatever word combos come to mind.
Then sit and reflect which represents the message you’re going to convey with your blog.
RELATED READ: How to Find Mom Blog Name Ideas
Have more than one domain name you like?
Visit NameSilo.com (my domain registrar of choice!) and see if the .com is available.
It might just be that only one of your choices is available as a .com – that’s your blog name!
Congratulations mama!
You’ve just laid a big part of your blogging foundation down! 🙂
Why did I tell you to use NameSilo.com to check and register your domain?
Their registration fee is by the cheapest I’ve seen online AND they give you free WHOIS privacy at no charge.
Other blogging resources will tell you to register your domain with a hosting company but you really shouldn’t (for reasons that are outside the scope of this post. If you really want to know, shoot me an email! 🙂 )
Step 3 – Get Hosting in Place
Hosting is important.
Hosting is not something you should try to save money on.
Your host and their servers are what is responsible for keeping your blog up and running.
There is nothing worse than an unreliable host.
Nothing, seriously.
Think about how hard you’re working to establish yourself as a blogger – the last thing you need to deal with is a slow server or your blog going down.
I use SiteGround and I love them dearly – I’ve been with them for almost 4 years now.
It’s been a good relationship for me – SiteGround is reliable – I never lose sleep wondering if my site is performing the best it can.
SiteGround is pretty affordable too – for the first year.
Something a lot of other bloggers won’t tell you is that no matter which host you decide to go with, the cost will increase a fair amount the second year you have your blog.
Remember when I said hosting isn’t somewhere you should look to save money?
When you see the increase in your hosting charge don’t jump ship to save money.
Remember this is the service that is keeping your blog up and running so you can build it into that business you’re dreaming about so you should be prepared to pay for that service.
Choosing a host is probably one of the most important decisions you’ll make about your blogging business.
Okay, mini rant over – I just wanted you to be aware, okay?
If I were you, I’d start with the ‘StartUp’ package.
It’s perfect to get you started.
So check out SiteGround because I only recommend services and blogging tools I actually use. 🙂
Step 4 – Set Up WordPress
Since I’m not filling this post up with nonsense and fluff, I’ve assumed you will use WordPress as your blogging platform and not a free service like blogger.com or something else.
The end. 🙂
Just kidding – here’s why – WordPress is the most popular self-hosted platform for blogs with good reason.
It’s free, easy to use and comes with thousands of blog themes (some paid, others free) and add-ons that are called plugins.
Plugins extend the functionality of your website beyond what your chosen theme can do.
There are thousands of really cool FREE plugins to choose from and, of course, paid plugins that will help you rock your blog.
If you’re scratching your head about plugins, download my printable – Must have plugins and what they do! – it’s FREE! 🙂
I’m going to add a mini tutorial at this point showing you how to install WordPress on your blog.
It’s SUPER SIMPLE and to the point, so don’t worry if you’re like a deer caught in headlights with technical stuff.\
I have you covered! 🙂
I am going to assume you chose SiteGround as your host.
Other hosting companies will have similar processes, so you can likely figure it out if you chose another host.
Log in to your domain registrar (in my case, it’s NameSilo) and locate your ‘domain manager’ under ‘account options’ and click to open it.
Here’s what it looks like:
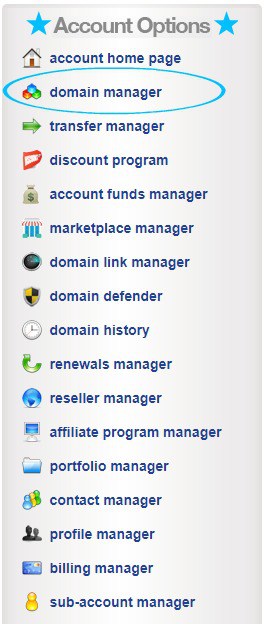
After the domain manager opens you will the domain name listed.

Check the box off like above, then choose ‘change nameservers’ in the menu above your domain listing.
Click to open it.
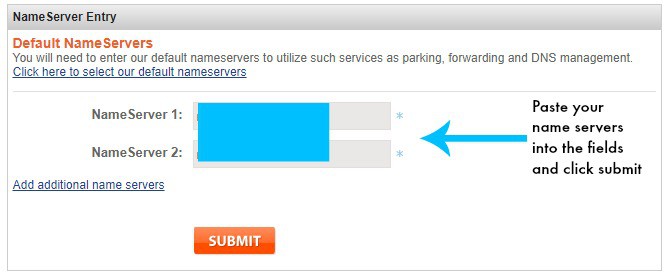
Once that’s done, open a new browser window and log in to your hosting company and locate your cPanel.
(Your host will email you all of this information)
Your hosting nameservers will be in cPanel.
This tutorial uses SiteGround.
Here’s what it looks like:

Copy your nameservers one at a time and fill them into the spaces in your domain registrar.
Here’s what it looks like:

Sometimes you will need to wait for technology to do its thing and for your nameservers to change successfully 🙂
Once the process is complete, you need to add your domain to your cPanel.
You do this under Domains and select ‘addon domains’ in cPanel.
Here’s what it looks like:

Once you click ‘addon domains’ you’ll see a page to fill out your information.
Here’s what it looks like:


Now you need to locate the WordPress installer in your cPanel.
Most hosts have a push button installer for WordPress that makes the process super duper simple.
Here’s what it looks like:

Click on the WordPress installer and follow the instructions 🙂
Related Read: What are WordPress Plugins?
Congratulations!!
You’ve chosen what your blog will be about, registered the domain, found hosting and installed WordPress on your blog.
Go, mama!
Now it’s time to…
Step 5 – Pick a WordPress Theme
You’re almost finished laying your blog foundation!
Now, you need to choose a theme that will grow with your blog.
A lot of other bloggers will say you can use a free theme, but I advise not to.
Free themes don’t have as many functions and you will inevitably need to make a switch to a paid theme as your blog grows.
So why wouldn’t you set up things properly from the word go? 🙂
Sure, the cost of doing things right is higher.
But, I promised you no fluff and so I have to be honest – bloggers who tell you that creating a blog is super cheap, aren’t being completely honest with you.
To me, it’s more like they’re setting you up to spend more later.
A blog redesign can be costly, especially if you don’t have the technical know how.
MomBlogLife.com is built on the Genesis Framework, using the Divine theme by Restored316Designs.
I highly recommend using the Genesis Framework and a related child theme. The functionality is unbelievable – if you choose to use it, you are truly setting your blog up with a solid foundation 🙂
Related Read: Feminine Genesis Themes
Investing in the Genesis Framework and one of the feminine genesis themes will allow you to get the look and feel of your blog down pat. It’ll appeal to your readers and it looks professional.
Here’s how to choose a feminine Genesis theme:
✔ Check out StudioPress and purchase the Genesis Framework (you won’t regret it – I promise! 🙂 )
✔ Shop Restored316Designs
✔ Shop Studiomommy
Restored316Designs and Studiomommy create the best feminine genesis themes I’ve seen. I own themes from both and cannot recommend them enough.
Don’t worry about theme set up either – both ladies provide amazing tutorials for any theme you choose.
Congrats Momma!
You’ve made it through my tutorial post about starting a blog for stay at home moms.
You’ve laid your blog foundation properly and now you are ready to start conquering your content!
RELATED READ: Mom Blog Content Creation


