A Simple Guide To Help You Create A Mom Blog


This post may contain affiliate links. As an Amazon Associate, I earn from qualifying purchases.
If you’ve wondered how to create a mom blog, you’re in for a treat – this post is my super simple guide to starting a blog – no fluff.
I hate fluff – I’m more of a get to the point gal because I don’t have time to waste and neither do you. 🙂
If you’re still on the fence about starting your mom blog here are some points that should help you decide:
✿ You can make money on your own terms.
✿ You can be creative.
✿ You can be around for your kids.
✿ You can eliminate your 9-5 if you have one.
✿ You can be a mom boss. 🙂
If those points didn’t convince you then nothing will.
The following guide will show you how to properly set up a self-hosted WordPress blog using SiteGround for hosting.
I never recommend setting up anything else because really isn’t any point.
I could lead you down a garden path but it’ll only cause you more work in the future so let’s get your blog started the right way, okay?
This guide shows you how to create a mom blog and get it live on the web.
What it doesn’t cover is the patience you’ll need to actually grow a successful blog.
Blogging is a marathon, not a race and anything actually worth building will take TIME.
Success won’t come overnight.
Heck, it may take you two years to see the results you want.
Now that you know – let’s not waste any more time and get your mom blog live!
RELATED READ: How to Find Time to Blog When You Have Kid(s)
A Super Simple Guide To Creating Your Mom Blog

Step 1 – What’s Your Niche?
Choosing a niche that you at least somewhat enjoy is important since you will be creating content on those topics for some time.
No, you don’t need to be uber passionate about the topic but you certainly have to like it.
The easiest way to narrow down your niche is to take a good look at what you enjoy doing so much that you find the time to do it in your everyday life.
Here are some examples:
✿ Do you love to be organized?
✿ Are you always making kid-friendly healthy family meals?
✿ Are you a mom of twins? Triplets?
✿ Do you have all boys or all girls?
✿ Are you a mom of a special needs child?
✿ Do you love crafting or DIY?
✿ Are you a cook?
✿ Are you a vegan?
These are just examples to help get the juices flowing for your own niche.
As you can see, any of the topics above can be blogged about.
You might feel that you have many things that you’re interested in and wonder how you will possibly narrow it down.
A great way to eliminate topics is by evaluating the money-making potential of the niche you want to build your blog in.
You aren’t creating a mom blog as a hobby – the goal is to make money so there’s no point in wasting your time because you like a topic but there’s no way to make money with it.
Need an example? (I usually do so I’ll share one with you 🙂 )
Say you love yoga so much that you teach it part-time.
Makes sense that you could blog about yoga but it might be harder to monetize since most people go to a studio or watch a video online.
You could monetize your blog by being an affiliate for yoga products or creating your own down the road.
You could also build enough traffic to your blog so that you could get ad revenue.
My point is, figure out what you would like to write about and then peel the onion back to see how much earning potential the topic has.
READ THIS POST: 8 Ways Moms Can Make Money With a Blog
Step 2 – Brainstorm Domain Ideas
Okay, you’ve selected your niche and now it’s time for some fun!
Go ahead an put your creativity cap on and brainstorm a name for your mom blog!
Take time to brainstorm as many potential names as you can.
I aim for 5 ideas that I’d be happy with – that doesn’t mean you have to, but I recommend brainstorming more than one idea in case some aren’t available.
Things to remember while you brainstorm:
✿ Your domain name is like the title of a book – it’s the first way you let your readers know what your blog is about.
✿ Always get the .com extension – despite what others may say, .com is still the most trusted extension and yes there are many still left so don’t get discouraged.
✿ Keep your name as short as possible – okay, this is a steadfast rule but the shorter the name the easier it is to remember.
✿ Avoid hyphens – you want your tribe to remember your blog name and hyphens just make it harder.
Once you have a couple options you’d be happy with, visit NameSilo (reputable domain registrar – I have about 20 domains with them!) and plug in your ideas to see if they’re available.
Here’s what it looks like:

What should you do if more than one of your domains are available?
Choose the one that:
✿ Best communicates your blog’s message.
✿ Gets you excited to start your mom blog.
If you keep circling back to the same domain name more than the others – that’s the one to choose!
READ THIS POST FOR HELP: How To Find Mom Blog Name Ideas
Now that you have your domain name, it’s time to…
Step 3 – Register Your Domain
I told you to use NameSilo because, well, they rock.
The cost per domain registration is much lower than other registrars and WHOIS privacy is FREE for the first year.
(WHOIS protects your personal information).
Anytime I can save money I will so registering my domains with them just makes sense.
Plus, it’s a good idea to have your domain(s) registered in a different spot than where you plan to host them.
Why?
Simply because it’s more secure – kinda like not putting all your eggs in one basket, you know what I mean?
Also, registering through a hosting company is much more expensive and your privacy won’t be included but, alas, if you choose to register this way then skip step 5. 🙂
Step 4 – Get Good Quality Hosting in Place
Hosting is literally the foundation of your blog so it isn’t the place to skimp.
You need a host who is reliable and has excellent customer service.
My choice (and what this tutorial post uses) is SiteGround.
I’ve been with them for over 4 years and host several different blogs and I’m happy to report not one of them has EVER gone down.
That’s right – my blogs have been up for 100% of the time.
That’s why I recommend SiteGround.
What’s not to love?
✿ They have a record uptime of 99.99% – yup that means your site won’t go down for new reason.
✿ Reliable, safe, and fast.
✿ Awesome customer service
✿ Affordable.
✿ Free SSL certificate. (Important)
Here’s what their plans look like:
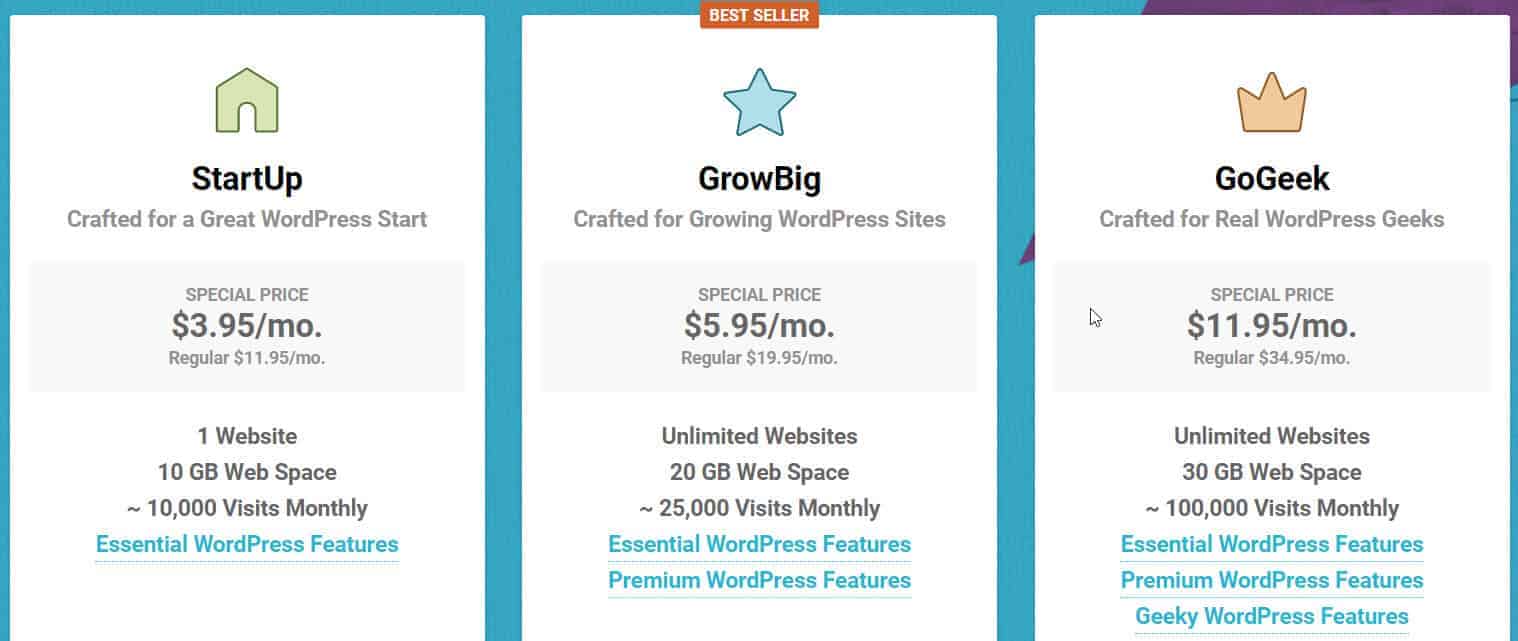
Choose the plan that makes the most sense for you.
If you’re budget conscious, go for the StartUp plan but if you want to get ready for some serious growth go ahead and get the GrowBig package (yes, that’s what I did).
Step 5 – Change Your Domain’s Nameservers t Your Hosts
We’re going to get a bit techie here but it’s not hard, so no worries, okay?
If you took my advice and use Namesilo and Siteground, here is exactly what it looks like to complete this step:
(The process will be similar with other providers. Just find the same information in their setup).
Step 1: Login to your Namesilo account and look at the account options menu on the right side of the screen.
Click on Domain Manager.
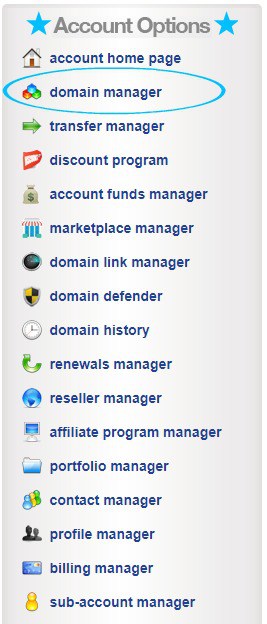
Your registered domains will be listed.
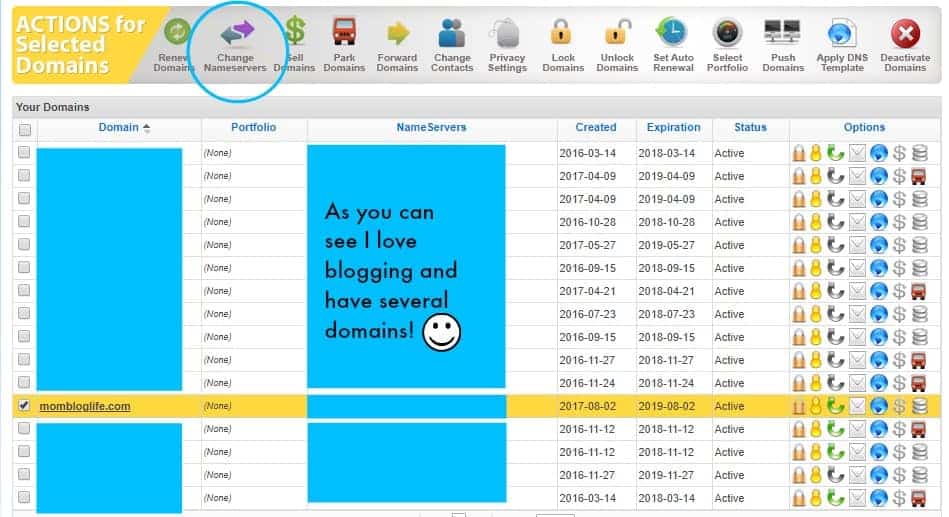
Step 2: Checkmark your desired domain, look at the ‘selected domains menu’ and locate ‘change nameservers’.
Click on it.
Here’s what it looks like:
Step 3: This will bring you to the NameServer Manager.
Look slightly down the page and you will see two spots where the name of your servers go.
Get the name servers from your host
If you’re using SiteGround, the nameservers are located under account information a few lines down.

Copy your name servers, go back to your domain registrar and paste them into the fields.

It may take a few minutes (up to an hour at times) for the change to go through.
Hold off on step 6 until you see the change in your domain registrar.
Under Account Options ==> Domain Manager ==> Domain listing, you should see where the nameservers are pointing.
If they match what your hosting says you are good to go!
Step 6 – Install WordPress on your Domain
We’re almost done creating your mom blog!
Now it’s time to install WordPress.
Most hosting companies have a ‘push-button’ service that is fairly easy to use.
Here is what it looks like using SiteGround 🙂
Login to cPanel and find the section called ‘WordPress Tools’.
There you will see the installer.

Click on it and select ‘Install Now’.
It’ll take you to a page that looks like this:

Scroll along and fill out the information.
Here’s some help:
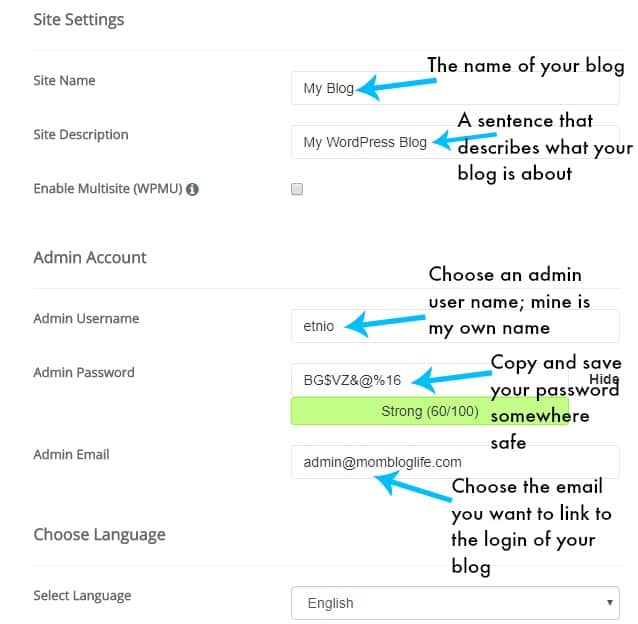
Choose the admin email that makes the most sense for you.
Click install!
Congratulations!
You wanted to create a mom blog and now you have!
You can log in to the back end of your mom blog at http://yourblogname.com/wp-login.php (change the info to reflect what your domain is 🙂 )
Step 7 – Choose a Theme for Your Mom Blog
Choosing a theme is fun.
It conveys the look and feel you want your blog to convey.
You could start with a free theme but I advise against it.
Most are limited in capabilities and will cause you more work down the road.
Here are some reasons to get a paid and professional WordPress theme:
1. The internet today demands well laid out, aesthetically pleasing and professional website.
I’m sure you agree the internet looks a lot better than it did say 10 years ago.
That’s because a well laid out site that looks nice is the first step in building trust with your visitor. Humans are visual people. So, yes, the way your mom blog looks does matter.
2. A professionally built theme functions better and will grow with you.
Imagine creating your stellar content and then finding out your theme doesn’t display it nicely on mobile, a tablet or laptop.
No matter the device your audience is on, you want them to easily navigate your site.
You also want the ability to add different functions to your blog without causing something to crash and burn.
3. If you’re not a techie person, a paid theme has all the hard coding done for you.
Free themes really are just bare bones.
Where do you find good paid themes that don’t break the bank?
Here are my favs (they’re also trusted throughout the blogging community):
- Genesis Framework by StudioPress and their related themes.
- The Extra Theme and Divi Builder by Elegant Themes.
READ THIS POST: Feminine Genesis Themes Perfect for Your Mom Blog
This blog is built using the Extra theme from Elegant Themes, in case you want to know. 🙂
That’s a wrap!
You’ve successfully learned how to create a mom blog and have taken the right steps to lay a solid foundation for the success of your blog.
The next step is creating content for your blog.
CHECK OUT MY TUTORIAL: Mom Blog Content Creation
What did you think about this tutorial post?
Have any questions?
Let me know in the comments!


